How do you feel about having your students collaborate in Google Drive?
Having students collaborate in Google Drive is one of my all time FAVORITE features of the entire cloud service. However, the collaboration component can take some getting used to for both students and adults! I remember my very first experience collaborating with others on a simple Google Doc and I was shocked, excited and sea sick all at the same time.Some teachers I have worked with in the past have been hesitant to introduce their students to the collaborative component of Google because they are worried students will delete each others' work, get off task or are afraid one student will do all of the work. Therefore, here are 5 ideas that will help your students avoid these types of disasters when students are working on the same assignment:
1. Color Code
When students are quietly working in small groups or with another person in a far away land on the same Google Document, I like for them each to pick (or you can assign) a different font color to color code their ideas. I always have a small table available in the corner of the assignment so students can type their name next to the color that will distinguish their work. When students type what they would like to add to the assignment everyone will see who contributed which ideas. This is a great way to hold everyone accountable to contributing to their group work.
Here is an example from a group of students who collaboratively took notes on a research project about Ancient Egypt:
I always have a doc ready to go preloaded with this table (notice how yellow isn't a color?) This is the FIRST thing students fill out before working on the doc. If you are interested in trying this method then click HERE for a blank copy of this doc that includes the name color chart.
2. Sharing One Folder

When working with younger students who have a hard time with typing, THIS tip will save your sanity. We all know that it could easily take 1st graders 20-30 minutes just to login to a computer. Usernames and passwords these days have more characters than a Disney movie. Help us all if a child's username has the @ symbol, - hyphen or some other character that requires the hold of the SHIFT key. This all comes in time with LOTS of practice😄 Therefore, having younger students type another student's Google username into the SHARE box could easily take the entire class period. Side note: I DO believe this is an important skill for all students to learn....eventually.
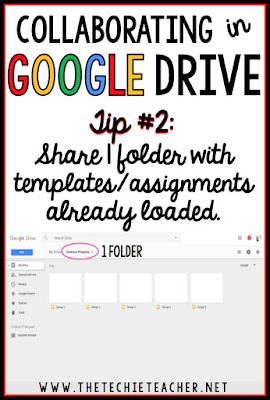
To avoid the 30 minute hunting and pecking session that the Google collaboration share settings could potentially create with elementary students, simply make ONE Google folder preloaded with the template or assignment you want students to collaboratively complete.
For example, here is a folder entitled SCIENCE PROJECTS. Inside of the folder are 5 different blank Google Slide presentations I was able to create within seconds. I entitled each presentation with the group number so students would know which one to click on. Students visit the folder, click on their presentation and then the collaboration begins!
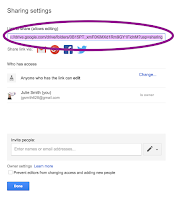
Don't forget💡 If you end up using this method you will have to change the share settings on the folder you create so students can access and edit the files. Click on the name of the folder>Share.
Click Advanced:
Next to Private click Change...
Change it to Anyone with the link CAN EDIT.
 You will then be given the URL address that you can drop into Google Classroom, share via Google (if your school has created a Group address for your class), place wherever students go to easily click on links or turn into a smaller url using free tools like Tinyurl or Bitly.
HUGE TIMESAVER!
3. Revision History
The revision history feature should be every teacher's best friend and I am so surprised how many teachers still don't know about this hidden gem! Revision history can tell you who edited and at what times as well as allow you to revert to a previous version of the file.To do this, open the document, presentation, spreadsheet or drawing and go to File>Revision History. On the left hand side of your screen you will see everyone who has edited the file, how often they edited and the timestamp:
To restore a previous version (say a student deleted a slide), click on the name and you will see the link to Restore this Revision:
You also might want to click on Show more detailed revisions at the bottom of this menu to reveal more edits:
Note: When you pull up the revision history and click on a name, text that has been added will be highlighted within the file and text that has been deleted will be shown with a strikethrough.
4. Add Tables
If students have a hard time clicking on the same doc and/or slideshow and typing at the same time, I like to add tables to help them stay focused and avoid that sea sickness I mentioned earlier that is caused by the cursor bouncing around when multiple people are typing. In fact, the first time I show students the collaborative feature in a Google Doc, I add a table with numbers. Students find their class number, click in the box and type their name. THAT'S IT. Their attention is focused on THEIR box and they have a specific location that will allow only their cursor (well, that's our hope) to click.
Here is an example of one of those docs with a table. Students had created their own website using CheckThis and the teacher wanted the students to have access to each other's websites. So students added both their name and the url of their website to this one Google Doc and then the students could click on each other's websites quickly and easily. This was a class of 24 third graders who all added their information to ONE doc. Since this was their first time seeing a collaborative Google doc in action, I called out their numbers slowly. When they heard their number they knew they could start typing in their box. Just like any skill/concept you teach, you have to go slowly in the beginning. When they start to pick it up then you can speed up the process on collaborating on the same assignment!
 |
| You gotta love the student who misspelled their name😂 |
5. Comments & Chat
Teach your students how to effectively use the comments and chat features to communicate with their team members if they are not working near each other. I always tell students that the comments and chat are strictly for:
💻 planning/brainstorming
💻 asking questions
💻 offering suggestions
We talk about how these features are important so we don't change or delete anything our team members have added that could eventually cause hurt feelings. Instead, by offering suggestions or asking for clarification on something they are able to open digital lines of communication.
 For comments, highlight a word or words and click the comment icon that you see pictured to the left. It appears in the tool bar and it also pops up in a little bubble when you highlight a word or words. Type your comment in the box that pops up and then click the blue Comment button. To see exactly what someone is commenting on, click the actual comment and then the word or words are highlighted for the viewer.
For the chat feature, click the speech bubble that appears next to the icons at the top that represent who is working on the doc, presentation, spreadsheet or drawing:
A chat box will pop up:
Communicate back and forth!
Be sure to check out my FREE video all about these tips in my TpT Store:
When it comes to collaboration in Google Drive my biggest piece of advice is simply to start small. Once students understand how it works and get used to multiple people working on the same assignment, it will become second nature. Last year I was working with some 5th graders on an activity in Pixie (a drawing program). They wanted to know how they could share their work with a friend so they could work on it together just like they did in Google. When I told them that feature wasn't availble in Pixie they just couldn't believe it. They told me they would much rather use Google Drawing. Amazing.
Check out these helpful digital collaboration poster reminders:
There is so much value when it comes to collaborative work. What ways do you have your students communicate and collaborate in your classroom?
Follow me on Pinterest to get more techie ideas:


