

A few years ago I wrote THIS blog post about the different ways you can share Google Drive files and templates with students. I would like to revisit this topic since I have been talking to many teachers who are just beginning to experiment with Google Apps for Education.
I polled our Teach with Tech Facebook Community to see what educators were currently using as a Google Drive workflow and here were the results:

I am not surprised in the slightest that the use of Google Classroom is the most popular. It is always my recommendation! However, I've spoken to several educators in the past year that are unable to use Classroom for various reasons so I want to explore several options.
Google Classroom
If you have access to Google Classroom then I would highly suggest going this route. I PROMISE you can do it. It is very intuitive! This is a one stop shop for managing files you send to students and you can easily view their work without having files emailed directly to you. For directions on how to set up your class, click HERE.
If you are a media specialist or teacher who sees multiple classes then you have a few options:
- You could join the class' homeroom teacher's Google Classroom as a co-teacher
- You could create a class for each class you see
- You could create a grade level classroom for all of the students in each grade to access
I recently was working with a media specialist who wanted to use Google Classroom with her 2nd-5th grade classes but very few teachers in her building were using it so she didn't have the option to join a classroom as a co-teacher. Therefore she opted to create a classroom for each grade level so she only had to manage 4 different classrooms.
Students can join and access the classroom you set up by visiting classroom.google.com and clicking the + sign in the upper right hand corner. They should click on Join class.
 |
| Student View |
They will need to enter a class code that can be found under the People tab within the teacher's Google Classroom account. Students can also be added manually by typing in their addresses but I think using the code is the way to go, especially if you having to setup multiple classes.
 |
| Teacher Account |
Once you have your classroom set up you can assign all different kinds of activities by clicking on the Classwork tab and click Create.

If you have a Google template of some sort that you want to send students (you can make your own templates or you can purchase all sorts of templates and activities from TpT!) then you would want to click on Assignment. ☝
Type in a title for your assignment, instructions (optional), how many points the assignment will be worth or if it is ungraded and a due date if you care to have one. Before pressing Assign, you will want to click the dropdown menu pictured below and select Make a copy for each student. Then you can assign.

I know a lot of elementary teachers who strictly use Google Classroom to share files and links with students. They don't set due dates or use the grading features. And that is OKAY. It's totally up to you!
If you teach multiple classes and are going to assign the same activity to all classes you can send assignments to multiple classrooms when making an assignment in one classroom. You can quickly do this by clicking the dropdown menu next to For and selecting the classes you wish to assign the activity/template to by clicking the box next to each class name. This way you don't have to go into every classroom you have created to post the assignment!

When students go to Google Classroom and click on the assignment, it will automatically make a copy so they will have their own file to work on. If you are interested in learning how you can differentiate assignments that you can send to specific students, click HERE for directions.
Share Straight to Students' Google Accounts
The second most popular way educators are sharing Google Drive files with students is by sharing straight to their Google accounts. How does that work? Well, any file you create in Google Drive has a blue Share button that appears in the upper right hand corner. When you click on the Share button you will be taken to this screen below:

You can enter your students' addresses in the box one at a time or you could set up a distribution group that will automatically populate all of your student accounts when you enter the title of whatever you named the group (ex. Mrs. Smith's 2018-2019 Class). Some school systems have distribution lists already created for teachers so that you don't have to type each students' Google address into the "Share" box. If you are not aware if you have a distribution list set up for your class, go to the Google Apps icon and click on "Groups".

Click on My Groups. If no group exists, then I would take the time to create a group with all of your student Google addresses. This will save you SO much time down the road. Then, whatever you end up naming your group is what you would type in the Share box. Remember, when you want to share something, open the activity you want to send your students and click the blue SHARE button.
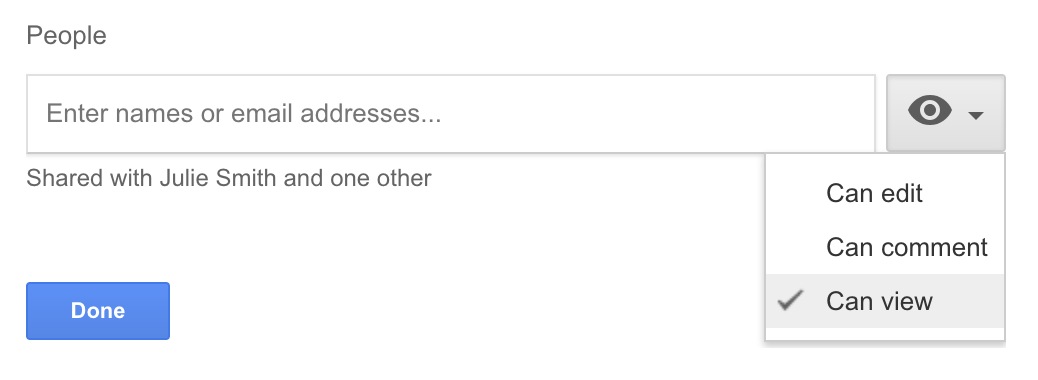 After student addresses have been entered into the Share box, you will need to decide if you want to change the default setting: everyone with the link can edit. This means, if you share your file with students they can all jump on and start adding/changing the content. If you want it to be collaborative then keep the default setting as is. If you intend for students to work on their own copy then I would suggest changing the share settings to everyone with the link can view.
By doing this, students can't accidentally edit anything on the file they open before making their own copy. Students will find the files you send to them in the Shared with Me section of Google Drive:

Once they open the file, students can go to File>Make a Copy to create their own version that they can EDIT. In order for the teacher to see student work, the students will need to send it back to the teacher's Google account by clicking on Share and typing in the teacher's Google address. ☝This is when Google Classroom makes work flow so much easier, more seamless and more organized.
LMS
The third most popular way educators are sharing Google files with students is through their district's learning management system (LMS). There are so many different LMSs and I'm not familiar with all of them so I'm not going to type out step by step instructions for each. But here are some resources that might be helpful:
Shared Folders
The fourth most popular way educators are sharing Google files with students is through Google Folders. This was how I helped teachers set up their Google workflow before Google Classroom came into the picture. Basically the teacher and student can share items back and forth through shared folders. These folders are created and shared ONE TIME and then anything that is placed in the folders will automatically pop up on each user's end.
You can create and share a folder with all of your students by going to your Drive>New>Folder and name your folder (ex. Class Work, Assignments, From Mrs. Smith). You can even add an emoji to your folder name to jazz it up a bit😋
You can create and share a folder with all of your students by going to your Drive>New>Folder and name your folder (ex. Class Work, Assignments, From Mrs. Smith). You can even add an emoji to your folder name to jazz it up a bit😋

Right click, two finger tap or hold down the Control key while you click on the new folder you created and select Share. Type in all of your student addresses or group distribution list title, set the share settings for the folder to Can View Only and send the folder to all of your students so no one can edit, move or delete any items in the folder. Students WILL be able to make their own copy of Google files that are in the folder. Once this folder has been sent, that's it from the teacher's end until he/she is ready to give students an assignment/template.
I always have students go to their Shared with Me section once the folder has been sent and drag the folder to their My Drive. Even when that folder is in their Drive it will automatically be updated with whatever the teacher drops in it. Whatever is put into that folder will pop up on the students' end. With this method students would need to open the file that has been put into the shared folder and go to File>Make a Copy in order to have their own copy to work on.

To share their copy with the teacher, students would need to drag and drop or move their copy into a shared folder they have with the teacher. The teacher could set up a folder structure WITHIN the one shared class folder (one for each student) for students to use to "return" their work. However, this would mean all of the students in the class would have access (code for CAN DELETE) each other's work. I usually would have students create a classwork folder in their own Drive, name it with their first name and share it with the teacher's Google Account. The teacher would then drag and drop all of the shared student folders into his/her My Drive and then create a Student Work folder of his/her own to put all students folders into in order to have all folders in one spot.

Prompt to Make a Copy Links
Another way to distribute digital activities created in Google Drive would be to place a link to the resource that you set to automatically make a copy when the link is clicked to your class blog, website, server, Symbaloo, etc.. To do this, open the file you would like students to make a copy of and highlight the word "edit" and everything after in the url:

Replace the highlighted text with the word "copy":

This method is how I distribute my Google resources to other educators. Once they make a copy and rename it, the file is sent straight to their Drive and I don't have to worry about anyone disrupting my original file.
Seesaw
You can send Google Docs, Slides, and Sheets through Seesaw. However, it is important to note that Seesaw automatically converts those files to PDFs to be used within the Seesaw app when you click on Add File. Students will not be able to move digital pieces that might be part of the activity you share but instead can write, type, draw and record on top of the file.


If you want your students to get to a Google Drive file to work on within Google apps, click on Link rather than Add File and paste a force a copy link and press Continue. Once they click on this link it will open the file within the Google app in which it was created.
Are there any other ways educators are sharing Google Drive files with students? Let us know in the comments below!

